

6 Benefits of raised bed gardening

Raised beds not only look better, they’re also more productive than traditional garden plots.
Soon it will be time to quietly whisper the same words as everyone who has just landed in Las Vegas. “It’s time to gamble.” But from a gardener’s perspective, the type of gambling in our minds has nothing to do with cards, dice, or slot machines (Formerly known as “one-armed bandits” before they switched to the much more sedate button tappers).
Our preferred game of chance involves digging a hole, tossing in about $65, and hoping the payoff is a couple of nice home-grown tomatoes around August (just when they’re plentiful at any farmers market).
When the warmer Spring temperature tempts so many of us to open our wallets as visions of backyard vegetables put us in a horticultural trance, we are quick to forget all our past failures. I have two words for those who may want to roll the dice one more time….raised beds.

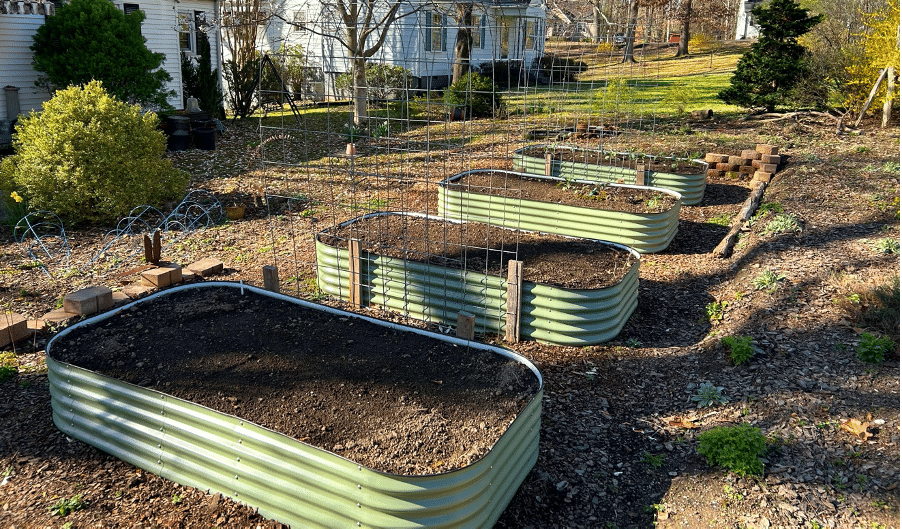
Our raised beds in the first year of production.
It’s no secret that raised garden beds outperform just stripping the sod and planting directly in whatever soil lies beneath. Here are 6 reasons to consider raised beds.
1.Controlled Soil –
When you have raised beds, you are in control. You can decide how much compost, loam, sand, etc. to add to get the soil texture you desire. More on how to fill your beds below but you’re taking a lot of the guesswork out of the picture and you’re not at the mercy of existing roots, rocks, and so on.
2.Better Drainage –
For vegetable beds that are at ground level, there is always a chance that the soil becomes clayey and dense over time. If these beds don’t drain properly, plants will suffer from root rot. With raised beds, you benefit from gravity as slow-moving water is never a problem. While I say this, you do have to make sure that the fill in these beds isn’t too sandy. If you’re not sure of your soil texture just grab a handful and give it a good squeeze. When you open your hand some of the soil should remain in a bit of a clump, telling you there is sufficient clay in the mix. If it just breaks apart you may want to add more loamy clay.
3. Accessibility –
It’s no secret that we become a less limber species as more birthdays roll around. With raised beds, there is just a little less bending over as opposed to traditional, in-ground beds. The finished height of your beds will depend somewhat on the materials you choose for construction. Our stone-bordered beds that I built many years ago were about 12” above grade at the time. I recently added one more layer to the cake by adding an 8” cedar frame to make this year’s harvest just a little easier to get to. (Plus, over the years, a few stray nearby tree roots have decided to creep into the original layer.)

This year, I decided to go up a little more.
4. Well-defined, tidy plots –
When you have raised beds, the size and shape remain nicely defined. There isn’t the slow migration of the boundaries you sometimes get with traditional in-ground veggie gardening. Overall, they look nicer, in my opinion.
5. Earlier Planting –
Since raised beds are exposed to the warmer air above ground, the soil also warms, allowing us to plant sooner. I’ll add here that another nifty benefit is that it’s quite easy to add stakes to the edges of the boards which in turn might support some breathable but protective barrier against a late frost. These same supports may be used to drape netting to protect plants from insects or as supports for climbing plants such as peas with the help of a bit of jute twine.
6. More Productivity –
I don’t have statistics (as I just make everything up!) but somewhere out there data will show that overall, there is more productivity resulting from raised beds vs. traditional. Check out the book “Square Foot Gardening” by Mel Bartholomew for more info. https://www.amazon.com/Square-Foot-Gardening-Fully-Updated-ebook/dp/B07JMNCBKR
How To
Location –
If you’re starting from scratch and have the luxury of a decent-sized property, look to the areas that receive full sun. Don’t worry too much that this has to be completely hidden from public view. Since raised beds are generally neater than traditional, they won’t be an eyesore to anyone. You will, however, want to place these not too far from a water source so you’re not lugging buckets during the sometimes crispy summer months. One more thing to consider is the location of your compost bin. Since you’ll hopefully be using some of this nice amendment in your raised beds, you may want to locate your new beds near the bin or vice versa.
Construction –
If you search, you’ll soon discover that there are as many types of materials from which to choose when it comes to raised beds as there are choices of yogurt at the grocery store. I’ve used stone to border our beds (because all landscape architects love to design curvy things and wood is harder to bend).
You can find plenty of examples of raised bed systems that are “floating” (on supports with open space below for storage or wheelchair access). Most systems I’ve experienced, however, are resting right on the ground. At our daughter’s house we’ve used some very nice corner supports in conjunction with rough-planed cedar 2” x 12”. Here are those corners from Gardeners’ Supply https://www.gardeners.com/buy/raised-bed-corners-set-of-2/8609669.html Not cheap but they’ll last forever.
One last thing on construction. Consider the width of your finished beds as you build. Four feet is about the maximum if you plan to move about all sides but still want to reach into the middle of these. If it is over 4’, you may have to recruit a local basketball star to pull a few weeds, or climb in there and get them.
Filling –
Even for the math impaired, it isn’t super difficult to calculate how many cubic feet of soil/planting medium you’ll need. Say your bed is 8’ x 4’ x 1’(tall). Multiply all these and you get 32 cubic feet. Since most mushroom compost, black cow, etc. bags come in 2 cu. ft. sizes, you’d need 16 bags. (Of course, there will be settling but even with that, this should do it for this bed. The finished depth doesn’t need to come all the way to the tops of the boards.)
I’ll bet you’ve just done some more math. 16 x $5/ bag = $80! Here’s a tip. You don’t need to fill the entire volume with soil. I recently saw a great video on Instagram where the guy put some cardboard on the bottom, added some small logs, layered leaves over this, and lastly finished with the soil. Instant drainage and the bottom layers will soon break down adding more organic material to those beds. Google “Hügelkultur” gardening to see more of what I mean.
Some very nice raised beds by Terumi and Ian Watson, Knoxville, TN.
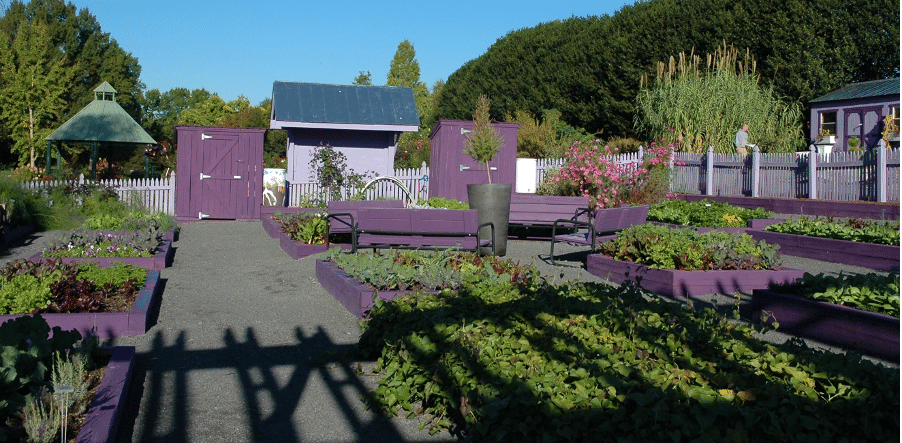
The Kitchen Garden at The University of Tennessee.
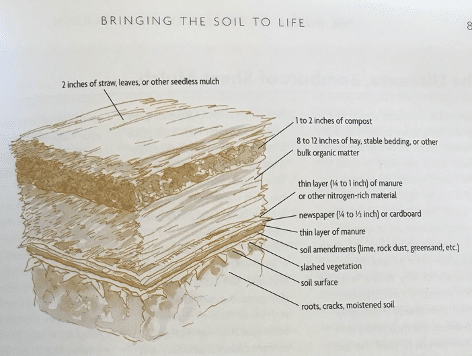
Soil Building for Other Areas – “Lasagna / Sheet Mulching –
A last side note before I let you get back to your life. I’ve been focused on raised veggie beds for this writing. But what if you just want to improve your soil in other parts of the garden? I encourage you to research “Lasagna mulching” or as it is also known, “Sheet Mulching”. Similar to Hügelkultur, this is the process of layering cardboard, leaves, straw, compost, and repeating to build layers that, like a nice lasagna, will meld together to build something beautiful over time. Here is an idea of what I’m talking about:
Alright, let the gambling begin! (But your odds are much better than Vegas).
Till next time,
HAPPY FARMING!
Please share and subscribe! https://ahomeforyourgnome.com/
PS – (I initially began this writing, “Now that the date of our latest Spring frost has passed” but I wanted to post it sooner even though we’ll likely get zapped at least two more times before it’s really Spring.)